Getting Started Guide
Introduction
Thank you for choosing MyClient as your monitoring solution for Ahsay.
To begin, visit your MyClient installation and ensure you are able to log in with your provided credentials. When you first log in, you will be required to change your password. You will be provided an administrator username and password via email.
You will be provided with a subdomain of our non-descript domain servermanagerpro.com. MyClient is designed to be fully brandable, and we expect customers may wish to use their own domain names. If you are using one of our Small Business or Enterprise plans and would like to use your own domain, please contact support to assign a hostname to your license and discuss your options for SSL connectivity.

Figure 1. Changing the password
Enable OBS API Access
MyClient requires API access to your OBS servers. Recent versions of OBS have no default restrictions on API access. If you have customized your web.xml file, or have upgraded through several OBS versions, please ensure that MyClient will be able to get API access to your OBS servers.
In obs/webapps/obs/WEB-INF/web.xml, find the section <filter-name>ApiAccess</filter-name>. If a range parameter exists with the value 0.0.0.0-255.255.255.255, MyClient will successfully connect to your OBS servers. If no such parameter exists, please add the following XML before </filter>;
<init-param>
  <param-name>Range3</param-name>
  <param-value>192.155.83.126-192.155.83.126</param-value>
</init-param>
IMPORTANT:
While every attempt is made to keep this guide up-to-date, the above IP address may not be accurate for your installation, depending on server demand, geolocation, and other features. To determine the correct IP address, please visit the "Manage Servers" page in your MyClient installation.
Some certain advanced features of MyClient also require access to the web console. You may also need to whitelist the SystemConsole section in the same way.
Replace Range3 as appropriate for the number of existing IP filters. You will need to restart your OBS server for changes to take effect.
Connecting to OBS Servers
You will be presented with the setup wizard. Read the introduction and proceed to wizard step 2.
To add an OBS server, select "Manage Servers" from the "Management" menu, and click "Add a new server". Then enter your server details and administrator credentials, ensuring "Synchronize Backupjobs" and "Synchronize Users" are enabled. If you are using our Small Business or Enterprise plans, you should now repeat this process for all your OBS servers.
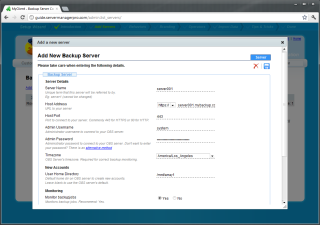
Figure 2. Adding an OBS server to MyClient
MyClient connects directly to your OBS servers, not via AhsayRDR. Once you have completed adding servers, return to the wizard by clicking the "Add Servers" tab at the top of the screen.
NOTE:
MyClient stores all credentials securely. If for any reason you are uncomfortable with MyClient storing your OBS administrator credentials, you may apply a workaround based on URL Rewriting.
Back in the Setup Wizard, click the "Synchronize Users" button to perform the initial synchronization of users and backupsets with your OBS servers. This opens a dialog informing you of the progress of the background task. The initial synchronization may take up to a minute to complete per 100 customers. You may leave this dialog running in the background while you continue with the wizard.
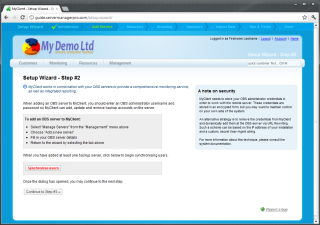
Figure 3. Before Initial Synchronization in MyClient
System Settings and Branding
To configure the system settings, select "System Settings" from the "Management" menu, and click "System Behaviour" (located under the "Behaviour" heading).
- Set the system timezone, system paper format, and any other settings you require.
- Return to the wizard by clicking the highlighted "Behaviors" tab at the top of the screen.
- Proceed to wizard step 4.
If you are using our Small Business or Enterprise plans, then you have the ability to completely customize the branding displayed in the portal interface. Otherwise your installation will display our default branding.
To configure the system branding, select "System Settings" again from the "Management" menu, and click "System-wide Branding" (located under the "Cosmetic" heading).
- Replace all the text with text of your own choice.
- Upload images to replace the system header, OBM, and ACB logos.
- Return to the wizard by clicking the highlighted "Branding" tab at the top of the screen.
- Proceed to wizard step 5.
Resellers and System Operators
If you are using one of our Basic, Small Business or Enterprise plans plans, MyClient is equipped with the ability to have multiple system users, each with a distinct set of permissions. For instance, you can separate your technicians from your system administrators and salespeople.
If you are using one of our Small Business or Enterprise plans plans, MyClient is equipped with full reseller support. Resellers in MyClient have access to all the advanced monitoring and reporting features of the system, while being restricted to their own customers. A limited amount of custom branding is available for each reseller office.
To create and manage system users for your staff and resellers, select "Manage System Users" from the "Management" menu.
TERMINOLOGY:
MyClient names the original service provider a "Primary Reseller"; this is your company, and has full permissions throughout the system. By default, your installation will be provisioned with one primary reseller. Primary Resellers are able to view all customers throughout the system regardless of owner, as well as make system-wide changes.
You may adjust the company details by clicking the Company Name entry, selecting the "Overview" tab, adjusting the details, and clicking the Save ( ![]() ) icon. Close the dialog window.
) icon. Close the dialog window.
You may reveal the system operators in a company by clicking the arrow (  ) to the left of the company's name. Adjust the name and permissions of a system operator by clicking on their displayed name.
NOTE:
Depending on which plan you are using, MyClient will offer individual system users the ability to be separated into separate permission classes. For instance, users can be designated as administrators, technicians, sales personnel, or billing administrators. A reference chart for determining feature levels is available on the Permissions Matrix ».
Continue to add system users and resellers. When you have completed managing system users, return to the wizard by clicking the highlighted "Operators" tab at the top of the screen.
SUPPORT SCENARIO:
There is an extra system operator named "MyClient Support" added by default to your installation. This account is disabled. If you wish to allow us access to your installation to verify a bug or correct any potential errors, you may do so by enabling this account.
Proceed to wizard step 6.
About Importing Customer Details
MyClient is designed to be an integrated monitoring solution, and the centre of your daily activities. It makes sense for MyClient to retain your customer data in order to provide effective monitoring, so you can see at a glance the customer behind the account name.
MyClient will store customer data for new accounts created within MyClient, but OBS has no such facility. If you are using our Basic, Small Business or Enterprise plans plans and you maintain separate customer data for billing or contact purposes, you may import it into MyClient at any point.
FUTURE FEATURE:
MyClient provides integrated customer management and a ticketing system. As well as this, development of an integrated sales and billing system is in its late stages.
If you do not wish to import customer data now, proceed to wizard step 7. You may decide to import customer data at any time.
OPTIONAL: Importing Customers
To import customer details to MyClient, select "View Customers" from the "Customers" menu.
- On the "View Customers" page, customers should have appeared in view via the synchronization process.
- Select "import" from the menu bar above.
- Select "import customer details" and press "Continue".
MyClient will let you download all existing customer records in .csv format. CSV files are editable with any common spreadsheet software, such as Microsoft® Excel® or similar. Make your changes to the file by copying data from your existing solution, and then re-upload the file. MyClient will interpret your uploaded data and display its results. Ensure that the displayed data is correct, and then click the button to proceed.
Return to the View Customers page to see that the data has imported successfully. You may view and make further changes to a customer's details from their page.
Return to the wizard by clicking the highlighted "Import Data" tab at the top of the screen, then proceed to wizard step 7.
Further Tasks
MyClient is now set up, branded, and synchronizing with your OBS servers. Backup monitoring will become more effective once MyClient has received a few days of backup history from your OBS servers.
Click the "Close Wizard" button to close the wizard and return to the MyClient homepage.
We encourage you to explore the system and look through the options in the "Management" menu above. In particular, we strongly encourage you to further customize the following areas of the system;
- Custom Account Plans
- This feature is available to customers using one of our Small Business or Enterprise plans, and allows further integration into your business workflow.
- Select "New account plans" under the "Behaviour" header on the "System Settings" page.
System Static Text
- This feature is available to customers using one of our Basic, Small Business or Enterprise plans.
- A large amount of text areas in MyClient are completely customizable.
- If you are using one of our Enterprise plans, you may also create new pages with the integrated editor, and add your custom pages as menu items within MyClient.
Select "Edit static pages, bulkmail templates and system messages", under the "Cosmetic" header on the "System Settings" page.
This item may be named slightly differently based on the capabilities of your specific installation.
Mailmerge templates
- Select "Upload Mailmerge templates", located under the "Cosmetic" header on the "System Settings" page.
- For more information on managing mailmerge templates, please read the text on that page or contact support for further details.
Backup Monitoring Priorities
System Communication Settings